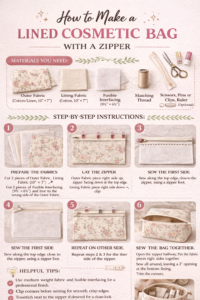
How to Sew a Makeup Bag with Zipper for Perfect Functionality
Installing a zipper is often the most challenging step when sewing a makeup bag. Many beginner and intermediate sewists struggle with uneven stitching, misalignment, or stiff closures that affect usability. When installed incorrectly, a zipper can compromise both the appearance and functionality of an otherwise well-made bag.
With the right preparation and techniques, zipper installation becomes a reliable and repeatable process. This guide explains how to sew a makeup bag with a zipper for smooth operation, durability, and professional-looking results, focusing on practical steps used in well-constructed bags.
Why Proper Zipper Installation Matters in Makeup Bags
A zipper is a functional component that directly affects user experience. A well-installed zipper allows easy access, smooth opening and closing, and long-term reliability.
Proper zipper installation helps to:
- Prevent fabric puckering and misalignment
- Ensure consistent closure performance
- Improve durability during frequent daily use
- Create a clean, polished appearance
Professional-looking makeup bags rely on careful zipper selection, accurate preparation, and controlled stitching techniques.
What Zipper Selection Ensures Long-Lasting Makeup Bag Function?
Choosing the correct zipper is essential for both performance and aesthetics. The zipper should complement the bag’s size, fabric weight, and intended use.
Recommended Zipper Characteristics
For most standard makeup bags, the following features work well:
- Length: 9–12 inches, depending on bag width
- Type: Medium-weight coil zippers for flexibility
- Slider: Smooth-moving, securely attached pull
- Finish: Optional water-resistant coating for cosmetic use
- Color: Coordinated or contrasting with the fabric design
Selecting a zipper that matches the bag’s proportions ensures smooth operation and comfortable access.
Why Coil Zippers Are Commonly Used
Medium-weight coil zippers are widely used in makeup bags because they:
- Bend easily around corners
- Operate smoothly without stiffness
- Balance durability with flexibility
- Perform well with both cotton and synthetic fabrics
These qualities make them suitable for everyday cosmetic storage.
Water-Resistant Zipper Benefits
Water-resistant or coated zippers help protect against:
- Cosmetic spills
- Moisture exposure
- Residue buildup around the zipper teeth
They are especially useful for travel or toiletry-style makeup bags.
How Does Precise Fabric Preparation Improve Zipper Installation?
Accurate preparation lays the foundation for successful zipper installation. Skipping this step often leads to uneven seams and alignment issues.
Essential Fabric Preparation Steps
Professional-quality results depend on:
- Accurate cutting with consistent seam allowances
- Applying interfacing to stabilize zipper areas
- Finishing raw edges to reduce fraying
- Pressing fabric for crisp, flat seams
- Marking zipper placement clearly before sewing
These steps reduce shifting during stitching and improve final appearance.
Interfacing for Stability
Interfacing strengthens areas where the zipper is attached and helps the fabric maintain shape.
Best practices include:
- Using fusible interfacing compatible with the fabric weight
- Applying interfacing evenly with correct heat settings
- Allowing pieces to cool fully before handling
This added stability supports long-term durability.
What Pin Basting Technique Helps Maintain Zipper Alignment?
Pin basting temporarily holds the zipper in place and prevents movement during sewing.
Effective Pin Basting Guidelines
For consistent alignment:
- Place pins every 2–3 inches along the zipper
- Position pins perpendicular to the zipper tape
- Check center alignment before stitching
- Maintain even tension on both fabric layers
- Remove pins gradually as you sew
This method keeps the zipper straight and evenly positioned throughout installation.
How Does Zipper Foot Stitching Create Clean Results?
A zipper foot allows the sewing machine needle to stitch close to the zipper teeth, which is essential for a neat finish.
Zipper Foot Stitching Best Practices
- Select a zipper foot compatible with your machine
- Adjust needle position for close-edge stitching
- Use a steady, moderate sewing speed
- Choose a consistent stitch length
- Guide fabric evenly without pulling
Careful control during stitching helps create straight seams and smooth zipper operation.
Final Tips for Sewing a Functional Makeup Bag Zipper
- Press seams before and after zipper installation
- Test zipper movement before closing side seams
- Trim excess bulk near zipper ends
- Reinforce zipper stops with backstitching
Attention to these small details improves both durability and appearance.
Conclusion
Learning how to sew a makeup bag with a zipper becomes much easier with proper preparation and technique. By selecting the right zipper, stabilizing fabric with interfacing, using accurate pin basting, and sewing with a zipper foot, you can achieve smooth, reliable closures that look professional and function well.
These methods help transform simple makeup bag projects into durable, polished accessories suitable for everyday use, gifts, or small-scale production.
SEO Reference (Optional)
Primary Keywords:
- how to sew a makeup bag with zipper
- makeup bag zipper installation
- sewing zipper into makeup bag
Suggested Internal Links:
Interfacing guide for sewing projects
Zipper sewing techniques
Makeup bag lining tutorials
Aries Gu is the founder of Q&N. With over 17 years of experience in cosmetic bag OEM/ODM source factory. He focuses on quality control, efficient communication, and on-time delivery for global cosmetic bag projects.