If you have ever tried to sew a cosmetic bag and ended up with a crooked zipper, bulky corners, or a pouch that looks more homemade than polished, you are not alone. A cosmetic bag seems simple, but it combines several techniques at once: fabric selection, interfacing, zipper placement, seam accuracy, turning, shaping, and finishing. That is exactly why it is such a useful project. When you learn to sew a cosmetic bag properly, you build a skill set that transfers directly to toiletry bags, travel pouches, organizer kits, gift bags, and even product development samples.
There is also a bigger reason this project matters. Beauty and personal-care storage is part of a growing product category, while handmade and small-batch goods continue to gain traction online and in gift-driven retail. That means a well-made cosmetic bag sits at the intersection of function, craft, and commercial potential. In this guide, you will learn how to sew a cosmetic bag from start to finish, how to choose the right materials, what sizes work best, how to avoid common mistakes, and how to make the final result look far more premium than a first attempt usually does.
Table of Contents
- Why Sew Your Own Cosmetic Bag
- Materials and Tools You Need Before You Sew a Cosmetic Bag
- How to Choose the Right Cosmetic Bag Size
- How to Cut the Fabric Correctly
- Step-by-Step: How to Sew a Basic Cosmetic Bag
- Common Sewing Mistakes and How to Avoid Them
- Ways to Upgrade Your Cosmetic Bag Design
- Why Choose QN Bags
- Conclusion and Next Step
- FAQ
1. Why Sew Your Own Cosmetic Bag
What makes a handmade cosmetic bag different from a ready-made one?
When you sew your own cosmetic bag, you control the details that usually separate a basic pouch from a satisfying product: size, shape, fabric hand feel, closure, structure, lining, pocket layout, and finish. Ready-made bags are convenient, but they are designed for average use. A custom-sewn version can be built around how you actually use makeup, skincare, medicine, or small travel essentials.
That flexibility matters more than ever. In the broader beauty ecosystem, packaging and accessory quality strongly influence perceived value. A polished bag can function as storage, gift packaging, a travel insert, or even a branded add-on. In short, you are not only making a pouch. You are making a product experience.
| Option | Main Advantage | Main Limitation | Best For |
|---|---|---|---|
| Buy a ready-made bag | Fast and easy | Limited size, quality, and style control | Immediate everyday use |
| Sew your own bag | Custom size, fabric, and features | Takes time and technique | DIY, gifting, prototyping, custom branding |
| Order OEM/ODM production | Retail-ready consistency at scale | Requires development and MOQ planning | Brands, retailers, and repeat programs |
Why do people sew one at home?
There are four common reasons. First, convenience: you need a pouch now and want something functional without shopping around. Second, creative interest: a cosmetic bag is one of the most satisfying beginner-to-intermediate sewing projects because it teaches zipper work without the commitment of a garment. Third, fabric efficiency: it is an excellent scrap-busting project. Fourth, learning value: if you can make a clean-lined zip pouch, you are already building skills used in larger travel bags.
There is also a strong DIY backdrop behind this. Handmade categories continue to expand, and research on the handicrafts market shows sustained growth tied to consumer interest in unique, eco-aware, and personalized goods. That trend supports the long-term relevance of small sewn accessories, whether for home use or small-batch selling.
Case Study: A simple cosmetic pouch can become repeatable surprisingly fast. One zipper-pouch tutorial by Melly Sews notes that after the first demonstration sample, three additional pouches were completed in roughly 35 minutes total. That is a practical reminder that once your workflow is set, a “small” project becomes a highly efficient one for gifts, craft fairs, or sample development.
Where is a custom cosmetic bag most useful?
A handmade cosmetic bag fits more situations than people expect. Use it daily for lipstick, compact powder, and touch-up basics. Use a medium version as a skincare organizer. Make a washable canvas or nylon version for gym and travel. Sew coordinated sets for bridesmaids, birthdays, launches, holiday gifting, or subscription inserts. If you work in product development, a home-sewn sample is also a smart low-cost way to test proportion before moving to factory sampling.
Suggested image alt: “DIY cosmetic bag sewn with zipper, lining, and boxed corners on a sewing table”
2. Materials and Tools You Need Before You Sew a Cosmetic Bag
How to choose fabric: cotton, canvas, nylon, or PU?
Fabric selection determines both the look and the sewing experience. For first projects, quilting cotton or light canvas is easiest because it presses cleanly and behaves predictably under the needle. For more structure, heavier canvas or laminated cotton works well. For travel-friendly or wipe-clean use, nylon and coated fabrics are more practical. PU gives a polished retail look but requires more control, because some machines struggle with stickiness and bulk.
| Fabric | Pros | Cons | Best Use |
|---|---|---|---|
| Cotton | Easy to cut, press, and sew | Needs interfacing for structure | Beginner practice, gifts, printed pouches |
| Canvas | More body, durable, less floppy | Can become bulky at zipper seams | Daily-use cosmetic bags |
| Nylon | Lightweight, travel-friendly, easy to wipe | Can shift while sewing and fray | Travel organizers and waterproof-feel bags |
| PU / faux leather | Premium look, easy to clean | Harder to unpick, may stick under the foot | Retail-look fashion cosmetic bags |
Experts often recommend matching structure to fabric rather than expecting fabric alone to do all the work. That is especially true for cotton. If you want the bag to keep its shape, pairing outer fabric with the right interfacing matters more than choosing a “nicer” print.
Which notions do you really need?
At minimum, you need an outer fabric, a lining fabric, a zipper, thread, and some form of structure. That structure can be woven interfacing, fusible fleece, or foam, depending on the look you want. You may also add piping, binding, zipper tabs, webbing, a handle, internal pockets, or a branded label. For first attempts, keep it simple: outer, lining, zipper, and light interfacing. Master the base construction before chasing too many features.
Professional bag makers pay close attention to zipper quality because it changes the whole feel of the product. A stable zipper foot helps you stitch close to zipper coils with more control, which is one reason experienced sewers treat it as a must-have tool for pouch projects.
Basic tools checklist
- Sewing machine with straight stitch
- Zipper foot
- Fabric scissors or rotary cutter
- Cutting mat and ruler
- Pins or clips
- Iron and pressing cloth
- Seam ripper
- Point turner or blunt stick for corners
- Marking pen or chalk
- Optional: walking foot, edge guide, double-sided basting tape
Expert Tip: Pressing is not a finishing step. It is part of construction. Press your fabric before cutting, press your zipper seams after attaching, and press the final shape after turning. Many “crooked” cosmetic bags are really poorly pressed bags.
Suggested image alt: “Materials and tools needed to sew a cosmetic bag including zipper, cotton fabric, interfacing, clips, and sewing machine”
3. How to Choose the Right Cosmetic Bag Size
What fits in small, medium, and large sizes?
The best size depends on use, not preference alone. A small pouch is ideal for lipstick, mini hand cream, compact powder, and emergency items. A medium pouch suits core daily makeup or travel skincare. A large pouch works for full kits, palettes, or mixed beauty and toiletry use. Many beginners make the mistake of going too large too early, which adds zipper alignment problems and excess softness.
| Bag Size | Suggested Finished Size | What It Holds | Skill Suitability |
|---|---|---|---|
| Small | 7–8 in x 4–5 in | Lip items, compact, cards, meds | Excellent for beginners |
| Medium | 9–10 in x 6–7 in | Daily makeup set or skincare basics | Best all-around practice size |
| Large | 10–12 in x 7–8 in | Travel sets, palettes, multiple products | Better after one practice bag |
What size should a beginner start with?
Start with a rectangle-based medium pouch. A finished size around 9 by 7 inches is large enough to see what you are doing, but small enough to keep corners, turning, and zipper installation manageable. This is also a common tutorial size because it uses fabric efficiently and works with a 9-inch zipper.
For a first project, straight lines beat curves. Avoid gussets, domed tops, and boxed side panels until you can consistently get a flat zip pouch clean and balanced.
How do you adjust the pattern for different uses?
Think in ratios. If you increase width, decide whether height should increase too, or the pouch may look overly flat. If you want more standing volume, add boxed corners or depth panels rather than just increasing width. If the bag is for brushes, raise the height. If it is for liquids, add depth and use a wipe-clean lining. If it is for gifting, consider a wide-opening top so the contents are easy to present.
Practical Insight: Travel-sized beauty is a meaningful use case. Circana reported that mini and travel-size fragrance units in the U.S. grew strongly in the first half of 2025. That does not mean every cosmetic bag should be tiny. It means compact, segmented storage remains highly relevant for beauty consumers and gift programs.
Suggested image alt: “Three cosmetic bag sizes compared side by side for small medium and large beauty storage”
4. How to Cut the Fabric Correctly
How do you determine cutting dimensions for outer, lining, and interfacing?
The cleanest method is to start from your desired finished size, then add seam allowance. For a basic flat pouch, outer and lining usually match. Interfacing is often cut either to the same size as the fabric or slightly smaller to reduce bulk in the seam allowance, depending on the interfacing type and the structure you want.
Example for a beginner bag: if you want a finished pouch near 8 by 6 inches, you can cut outer and lining rectangles at 9 by 7 inches and use a zipper at least as long as the top edge. That creates enough room for a simple construction flow without overcomplicating measurements.
| Piece | Typical Rule | Why It Matters |
|---|---|---|
| Outer fabric | Cut to pattern size including seam allowance | Defines shape and visible finish |
| Lining fabric | Usually same as outer | Keeps assembly simple and balanced |
| Interfacing | Same size or slightly smaller | Controls body without excess bulk |
How much seam allowance should you leave?
Choose one seam allowance and stay consistent. Many beginner pouch tutorials use 3/8 inch or 1/2 inch. The exact number matters less than consistency. If one side is sewn closer to the zipper than the other, the bag will twist. If one side seam is wider than the other, the pouch will not sit evenly.
Marking seam allowance on painter’s tape and placing it on your machine bed is a simple expert move that immediately improves accuracy.
Should you interface and press before cutting?
Press your fabric before cutting. For cotton, prewashing is often wise because shrinkage after sewing can distort the bag. Whether to fuse before or after cutting depends on your workflow, but for beginners, cutting fabric first and then fusing interfacing to the wrong side of the outer pieces is usually easier to control. It also helps prevent distortion caused by handling larger fused panels.
Professional Rule: Cut slowly, stack carefully, and keep grain direction consistent. Cosmetic bags are small, so even slight inaccuracy shows up quickly in zipper alignment and corner balance.
Suggested image alt: “Cutting outer fabric lining and interfacing rectangles for a beginner cosmetic bag pattern”
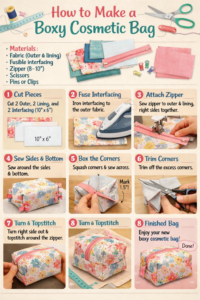
5. Step-by-Step: How to Sew a Basic Cosmetic Bag
Step 1: Attach the zipper to the outer fabric
Place one outer piece right side up. Place the zipper right side down along the top edge. Add one lining piece right side down on top so the zipper is sandwiched between outer and lining. Clip or baste in place. Stitch with a zipper foot close to the zipper teeth. Repeat on the second side with the remaining outer and lining pieces.
After stitching, flip the layers away from the zipper and press. Then topstitch near the zipper on both sides. This topstitching is not only decorative. It keeps the fabric from rolling into the zipper during use.
Step 2: Sew the lining and body
Open the piece flat and check balance before moving on. Outer panels should mirror each other, and lining panels should do the same. If one side is off, fix it now rather than after closing the pouch. Small corrections at this stage save major frustration later.
Step 3: Join the sides and leave a turning gap
Open the zipper at least halfway before sewing around the pouch. This is one of the most common beginner oversights. If you forget, you may finish the seams and realize you cannot turn the bag right side out. Place outer fabrics right sides together and lining fabrics right sides together. Match zipper seams carefully. Sew around the full perimeter, leaving a 2 to 3 inch opening in the lining for turning.
Step 4: Turn, shape, and close the lining opening
Clip the corners without cutting the stitching. Turn the pouch right side out through the lining gap. Use a point turner gently to shape the corners. Fold the raw edges of the lining opening inward and topstitch or hand stitch it closed. Push the lining inside, press the pouch, and zip it closed.
| Step | What to Check | Common Problem | Fix |
|---|---|---|---|
| Attach zipper | Equal seam distance on both sides | Wavy zipper line | Baste or clip more often, slow down |
| Topstitch | Fabric lies flat away from teeth | Fabric gets caught in zipper | Press and topstitch closer |
| Sew perimeter | Zipper open halfway | Cannot turn pouch | Unpick a seam and reopen zipper |
| Turn and finish | Sharp corners and even shape | Bulky or dull corners | Trim bulk and re-shape carefully |
Technique Benchmark: Experienced tutorial makers often describe a simple zipper pouch as a “building block” project. That is accurate. The same sequence—zipper, sandwich, topstitch, perimeter sew, turn, close—appears again and again in makeup bags, tech pouches, travel organizers, and retail sample development.
Suggested image alt: “Step-by-step sewing process for a lined cosmetic bag with zipper installation and turning opening”
6. Common Sewing Mistakes and How to Avoid Them
What if the zipper goes in crooked?
A crooked zipper usually starts before the seam. The zipper tape may have shifted, the fabric edges may not have been aligned, or the fabric may not have been pressed flat first. To prevent this, baste the zipper in place, use clips rather than too few pins, and sew one side completely before attaching the second side. On slippery materials, double-sided basting tape can be more reliable than pins.
A zipper foot helps because it lets you stitch close to raised zipper teeth with better control. That is one reason many sewing experts treat it as essential rather than optional for pouch work.
Why does the pouch body end up uneven?
The top causes are mismatched cut pieces, inconsistent seam allowance, and pulling fabric while sewing. Another common issue is not matching the zipper seam intersections when sewing the perimeter. When those points are off, the pouch looks twisted even if the outer shape is technically closed correctly.
If you notice imbalance early, unpick and correct it. Cosmetic bags are compact projects, so precision pays off quickly.
How do you fix puffed corners, wrinkles, or a bag that will not turn cleanly?
Bulk is usually the problem. Trim seam allowances, grade layers when working with canvas or PU, and clip corners carefully. Wrinkles near the zipper often come from insufficient pressing or from sewing too close on one side and too far on the other. Difficulty turning often means the opening in the lining is too small or the seam allowances are too bulky.
| Problem | Likely Cause | Best Solution |
|---|---|---|
| Zipper waves | Fabric shifted or stretched | Baste first and do not pull while sewing |
| Bag is lopsided | Uneven cutting or seam allowance | Measure again and use machine seam guide |
| Bulky corners | Too much seam bulk | Trim, grade, and clip corners |
| Lining bunches | Poor turning or oversized lining | Press inside carefully and smooth before closing |
Expert Tip: If your first bag is functional but not pretty, do not switch patterns immediately. Sew the same pattern again. Repetition improves pouch quality faster than constant pattern-hopping.
Suggested image alt: “Common cosmetic bag sewing mistakes including crooked zipper bulky corners and wrinkled lining”
7. Ways to Upgrade Your Cosmetic Bag Design
How do you add pockets, handles, and compartments?
Once the base pouch is under control, upgrades become much easier. Add a slip pocket to the lining before assembling the zipper. Add elastic loops for brushes or travel bottles if organization is a priority. Add a side handle using short webbing or folded fabric tabs. For a more substantial travel bag, add boxed corners or a bottom panel. The right feature should follow the intended use, not just aesthetics.
How can you add a logo, label, or print?
For home sewing, woven labels, printed cotton panels, heat-transfer logos, and small metal tags are the most practical. For sampling a brand concept, place the logo before final assembly so stitching remains clean. If you plan to scale the design later, think now about where branding will sit consistently on a production line: center front, side seam, zipper puller, or internal label.
How do you make the finished bag look retail-ready?
Retail-looking quality comes from discipline, not complexity. Use consistent seam allowances. Choose a zipper that matches the bag level. Press at each stage. Topstitch evenly. Reduce bulk in the corners. Keep the lining taut but not tight. Add structure that suits the fabric. Most importantly, edit the design. A clean, simple cosmetic bag with balanced proportions often looks more premium than an over-decorated one.
| Upgrade | What It Adds | Difficulty Level |
|---|---|---|
| Inside slip pocket | Better organization | Easy |
| Boxed corners | More standing volume | Easy to moderate |
| Side handle | Portable travel use | Moderate |
| Custom label or logo | Brand identity | Easy if planned early |
| Foam/interfacing upgrade | More structure and premium feel | Moderate |
Pros & Cons of Upgrading a Cosmetic Bag
Pros
- Improves functionality and resale value
- Makes the bag feel more customized
- Creates a stronger gift or brand presentation
- Allows you to test real product ideas before production
Cons
- More features create more sewing error points
- Extra structure can make seams bulky
- Too many details may reduce the clean retail look
- Costs rise quickly in both DIY and production settings
From an SEO and product trend perspective, this matters too. Consumers increasingly respond to storage products that feel both practical and elevated. Growth in beauty, gifting, travel sizes, and handmade retail all point in the same direction: useful, well-designed accessory bags continue to earn attention.
Suggested image alt: “Upgraded cosmetic bag design with inside pocket woven label side handle and premium zipper”
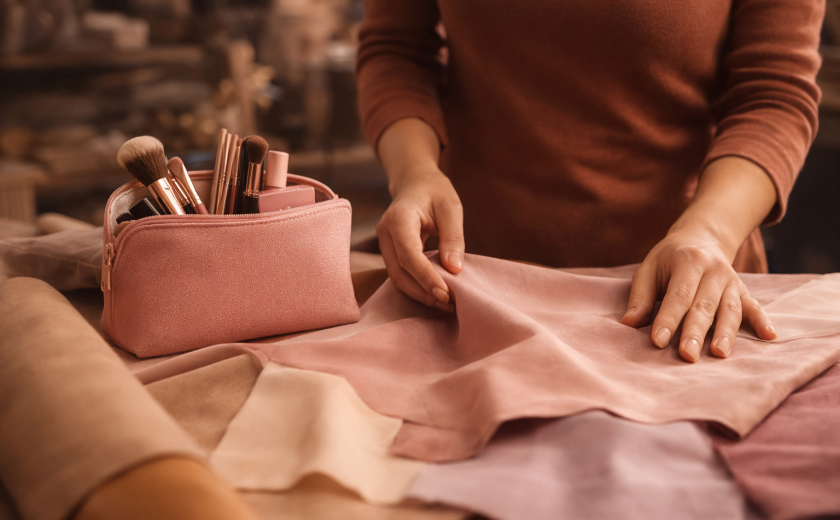
8. Why Choose QN Bags
Design support from concept to sample
If you are moving beyond DIY and want to turn a cosmetic bag idea into a brand-ready product, working with an experienced development partner can save a great deal of time. At QN Bags, design support can help translate a sketch, reference photo, or rough concept into a more practical bag structure, material plan, and sample path.
Free sample support for development
For buyers and brands, sampling is where dimensions, material behavior, logo scale, and construction details become real. A development-focused partner helps reduce trial-and-error and speeds up the move from idea to approval.
OEM and ODM options
Some customers already know what they want. Others need help shaping the product. That is why OEM and ODM flexibility matters. If you are exploring custom cosmetic bags, travel cases, or beauty accessories for your business, you can review custom cosmetic bag capabilities here and compare what makes sense for your launch stage.
Clear CTA: If your goal is not just to sew one cosmetic bag but to develop a bag that feels retail-ready, scalable, and brand-consistent, use your DIY sample as proof of concept and then move into professional sampling.
Explore QN Bags
Suggested image alt: “Custom cosmetic bag sample development process for OEM and ODM manufacturing”
9. Conclusion: Sew a Cosmetic Bag with Better Results
If you want to sew a cosmetic bag well, focus on the fundamentals first: choose a manageable size, pair the fabric with the right structure, cut accurately, install the zipper carefully, press every stage, and keep your seam allowances consistent. That formula works whether you are making a first pouch at home, building handmade gifts, or testing a new product idea.
The future of this category is also promising. Beauty-adjacent accessories continue to benefit from three broad forces: growth in beauty consumption, demand for organized travel-sized products, and ongoing interest in handmade and personalized goods. That means a cosmetic bag is no longer just a simple utility item. It can be a personal project, a premium add-on, a giftable accessory, or the start of a strong small product line.
Start with one clean, medium-sized pouch. Sew it again. Improve one detail each round. That is how you move from “I made a bag” to “I can make a bag people want to use, gift, or buy.” And if you are ready to scale that idea, a manufacturing partner such as QN Bags can help bridge the gap between handmade concept and retail-ready production.
Suggested external source links to insert in your CMS:
- Grand View Research — Cosmetic Packaging Market
- Grand View Research — Handicrafts Market
- Circana — U.S. Beauty Industry Grows in the First Half of 2025
- SINGER — How to Use the Zipper Foot
- Melly Sews — How to Sew a Zipper Pouch Tutorial
- h+h americas — article referencing Statista’s U.S. arts and crafts hobby survey
Tip: Link these in the introduction, trend callouts, technique sections, or author-note area rather than overloading the main copy.
FAQ
1. What fabric is best for sewing a cosmetic bag?
For beginners, cotton or light canvas is best because it is stable, easy to press, and forgiving. For a more travel-friendly bag, nylon or coated fabric is practical. For a premium look, PU or faux leather works well, but it is less beginner-friendly.
2. Do I need interfacing for a cosmetic bag?
Usually yes. Interfacing gives the bag shape, improves durability, and helps the finished pouch look intentional rather than floppy. Lightweight cotton almost always benefits from interfacing.
3. Can I sew a cosmetic bag without a zipper foot?
Yes, but it is harder to get close, even stitches beside the zipper teeth. A zipper foot makes installation cleaner and easier, especially for beginners.
4. How long does it take to sew a cosmetic bag?
A first attempt may take 45 to 90 minutes, depending on how often you pause, press, and correct mistakes. Once you know the sequence, a simple pouch can be completed much faster.
5. Is sewing a cosmetic bag beginner-friendly?
Yes. It is one of the best skill-building projects for beginners because it teaches cutting, zipper installation, seam control, lining, turning, and pressing in a manageable format.
6. Should I prewash the fabric before sewing?
If you are using cotton or canvas, prewashing is often a good idea because it removes shrinkage risk and helps the final bag keep its shape after later cleaning.
7. What zipper works best for a cosmetic bag?
A nylon coil zipper is usually the easiest for home sewing because it is flexible and easy to shorten. Choose a smooth, durable zipper that fits the weight and style of the bag.
Aries Gu is the founder of Q&N. With over 17 years of experience in cosmetic bag OEM/ODM source factory. He focuses on quality control, efficient communication, and on-time delivery for global cosmetic bag projects.