
A boxy cosmetic bag looks simple on the outside, but anyone who has tried to make one knows the truth: getting a bag to look clean, square, and professional is much harder than stitching a flat zip pouch. Many first attempts end up with slanted sides, puffy zipper ends, a bag bottom that will not sit flat, or corners that look rounded instead of crisp. That is why the boxy cosmetic bag is such an important sewing project. It teaches not only zipper installation, but also structure, depth, balance, and how three-dimensional storage products are actually built.
The appeal of the boxy cosmetic bag is also bigger than home sewing. In beauty, travel, gifting, and private-label accessories, structured pouches are popular because they hold more, open wider, and present products better than flat bags. That makes them useful for everyday users and highly relevant for brands. In this guide, you will learn how to make a boxy cosmetic bag step by step, how to choose the right materials, how to cut the pattern pieces, how to build a firm shape, and how to avoid the mistakes that make a handmade bag look less professional.
Table of Contents
- What Is a Boxy Cosmetic Bag?
- Why This Bag Style Is So Popular
- Materials, Measurements, and Pattern Basics
- How to Cut and Prepare the Pieces
- Step-by-Step: How to Make a Boxy Cosmetic Bag
- How to Make the Bag Look More Structured
- Beginner Problems When Making a Boxy Bag
- You Can Also Choose QN Bags
- Conclusion and CTA
- FAQ
1. What Is a Boxy Cosmetic Bag?
What are the main structural features of a boxy cosmetic bag?
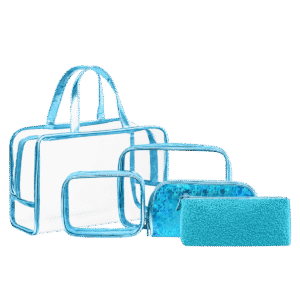
A boxy cosmetic bag is a zippered pouch designed with visible depth, defined corners, and a bottom that forms a stable rectangular or cube-like footprint. Instead of lying flat when empty, it is meant to hold shape. That “boxy” character usually comes from one of three pattern approaches: a long rectangle with corners boxed out, separate side and bottom panels, or a tube-like construction that is folded and squared at the ends. In all three versions, the goal is the same: more usable volume and a cleaner standing form.
This structure changes the user experience in a major way. A boxy bag usually opens wider, shows the contents more clearly, and makes it easier to reach for makeup, skincare, or travel-size bottles. In product terms, it is closer to a mini organizer than a soft pouch.
How is it different from a flat cosmetic pouch?
A flat cosmetic bag is simpler. It stores items, but often expands unpredictably once filled. A boxy cosmetic bag is designed to control that expansion. It creates intentional depth. That means better capacity, better display, and a neater silhouette on a shelf, vanity, or inside luggage.
| Feature | Flat Cosmetic Bag | Boxy Cosmetic Bag |
|---|---|---|
| Shape | Mostly two-dimensional | Three-dimensional and structured |
| Storage | Works best for slim items | Holds bottles, palettes, and mixed items better |
| Opening visibility | Narrower view inside | Usually easier to see and access contents |
| Retail presentation | Simple and casual | More premium and display-friendly |
That difference helps explain why the boxy cosmetic bag has become a go-to shape in tutorials, gift sets, and custom beauty storage projects. It looks more finished even before you add branding, handles, or lining details.
Suggested image alt: “Boxy cosmetic bag compared with a flat zip pouch to show differences in shape and capacity”
2. Why This Bag Style Is So Popular
Why do people like the larger capacity and clearer opening?
The boxy cosmetic bag solves a very common problem: small beauty items disappear in soft pouches. A structured base and wider top opening make products easier to sort, find, and remove. That matters for both daily use and travel. Instead of pressing around a soft pouch to locate a lipstick or mini serum, users can open the bag and see much more at once.
That practical advantage lines up with broader beauty demand. Circana reported that the U.S. prestige beauty market reached $16 billion in the first half of 2025, while mass beauty sales at mass merchants rose to $34.6 billion. Circana also highlighted growth in mini and travel-related fragrance behavior, showing that portable beauty and organized storage remain relevant in real consumer use. A bag format that handles mixed-size items well naturally benefits from that environment.
Why do brands and retailers prefer this silhouette?
Brands like boxy cosmetic bags for three reasons. First, the shape presents products better in photography, merchandising, and gifting. Second, it offers more printable or brandable surface area without collapsing awkwardly. Third, the bag itself feels more substantial, which can raise perceived value even before the customer touches the product.
That matters in a market where packaging, presentation, and accessory quality influence purchase decisions. Grand View Research estimates that the global cosmetic packaging market will continue expanding through the next decade, reflecting ongoing investment in how beauty products are stored, carried, and presented. In other words, the bag surrounding the product can become part of the product story.
Which consumer scenarios are best for a boxy bag?
This style works especially well for travel, vanity organization, gift-with-purchase programs, curated skincare bundles, seasonal launches, and everyday “all-in-one” makeup storage. It is also useful for categories beyond beauty, including baby care, tech accessories, wellness kits, and small retail-ready bundles.
Case Study: Melanie Ham’s well-known zippered box pouch tutorial presents the same general boxy construction in three sizes and describes the project as suitable for new and advanced sewers who are somewhat familiar with zippers. Her published timing—about 20 minutes prep time and 1 hour active sewing time—shows why the style is so widely taught: it delivers a visually impressive result without requiring garment-level complexity.
Suggested image alt: “Structured boxy cosmetic bag open on a vanity with makeup and skincare visible inside”
3. Materials, Measurements, and Pattern Basics
What fabrics and linings work best for a boxy bag?
A boxy cosmetic bag needs enough body to hold shape, but not so much bulk that the zipper corners become hard to sew. That is why fabric choice matters more here than in a flat pouch. Quilting cotton works if you add interfacing. Canvas and twill give more natural body. Nylon works well for travel and wipe-clean function. PU or faux leather can look premium, but it is less forgiving at corners and zipper ends.
| Material | Pros | Cons | Best Use |
|---|---|---|---|
| Quilting cotton | Easy to cut and sew | Needs interfacing for structure | Beginner practice and printed gift bags |
| Canvas / twill | More structure and durability | Can become bulky at seams | Daily-use boxy pouches |
| Nylon | Lightweight and travel-friendly | Can shift while sewing | Travel cosmetic bags |
| PU / faux leather | Premium look and wipe-clean feel | Harder to unpick and turn cleanly | Fashion-forward retail bags |
For lining, use something smooth but stable. Cotton lining is easy to handle. Nylon or polyester lining helps if you want a cleaner wipe-down surface. If the bag is intended for cosmetics that may leak, a more water-resistant lining can be worth the extra effort.
What are common size references?
There is no single perfect size, because a boxy cosmetic bag is usually designed around use. Mini versions work for compact essentials. Everyday sizes hold a normal makeup set. Travel versions allow room for skincare, brushes, or TSA-friendly bottles.
| Type | Suggested Finished Size | Best For |
|---|---|---|
| Mini | 7 x 4 x 4 in | Lip products, compact, small items |
| Everyday | 8.5 x 5 x 5 in | Core daily makeup or skincare |
| Travel | 10–11 x 6 x 6 in | Mixed beauty and toiletry storage |
How does the pattern create three-dimensional space?
The boxy effect comes from geometry. You either cut separate side and base panels, or you remove small squares from the lower corners and then stitch those corners into shape. Both methods produce volume, but panel-built versions often look more retail-like because the structure is more controlled. Corner-boxed versions are easier for beginners because they use fewer pieces.
If you are sewing for practice, a corner-boxed design is the fastest route to understanding the principle. If you are prototyping a product idea, separate front, back, side, and bottom panels usually give you cleaner control over final proportion.
Expert Tip: A boxy bag looks professional when height, depth, and zipper length feel balanced. If the zipper opening is too short for the bag body, the pouch can look squeezed. If depth is too large for the width, the bag may look stubby rather than elegant.
Suggested image alt: “Fabric options and size chart for a boxy cosmetic bag with mini everyday and travel dimensions”
4. How to Cut and Prepare the Pieces
How do you cut the main panels, side panels, and base?
The exact dimensions depend on your pattern method, but the safest beginner process is this: decide your finished dimensions first, add seam allowance, and then keep all mirrored pieces precisely matched. If you are using separate panels, label each piece immediately after cutting. Small sewing projects can actually become more confusing than large ones because similar pieces look almost identical.
For a classic panel-based boxy bag, you will usually have a front panel, back panel, two side panels, one base, and matching lining pieces. Some designs merge the base into the front and back panel. Others build the whole bag from one long main piece plus end panels. Any method can work if the measurements are internally consistent.
How much seam allowance and turning space should you leave?
Consistency matters more than the exact number, but 3/8 inch and 1/2 inch seam allowances are both common. On boxy bags, it is especially important to account for turning space and zipper-end bulk. If your seam allowance is too narrow at the corners, the bag may look stretched. If it is too wide, the finished dimensions shrink and the lining can bunch.
Always leave a turning opening in the lining large enough for the bag to pass through without fighting the fabric. For a structured boxy bag, that opening often needs to be a little bigger than it would be in a flat pouch.
Why does pre-applying interfacing make the bag look better?
Interfacing stabilizes the fabric before the shape is formed. That makes cutting cleaner, seams more accurate, and the final silhouette more defined. BERNINA’s 2026 DIY cube tutorial specifically notes using Decovil I Light to reinforce the lining for good stability, while Pellon describes its 987F fusible fleece as adding softness, body, and stability. Those are exactly the characteristics most boxy makeup bags need: enough shape to stand, with enough flexibility to turn and use comfortably.
| Interfacing Type | Effect | Best For |
|---|---|---|
| Light woven fusible | Adds stability without stiffness | Cotton and lightweight canvas |
| Fusible fleece | Adds softness, body, and light structure | Soft but shaped cosmetic bags |
| Firm bag interfacing | Creates a crisp standing form | Boxy bags meant to look premium |
Suggested image alt: “Cut boxy cosmetic bag pattern pieces with interfacing applied before sewing”
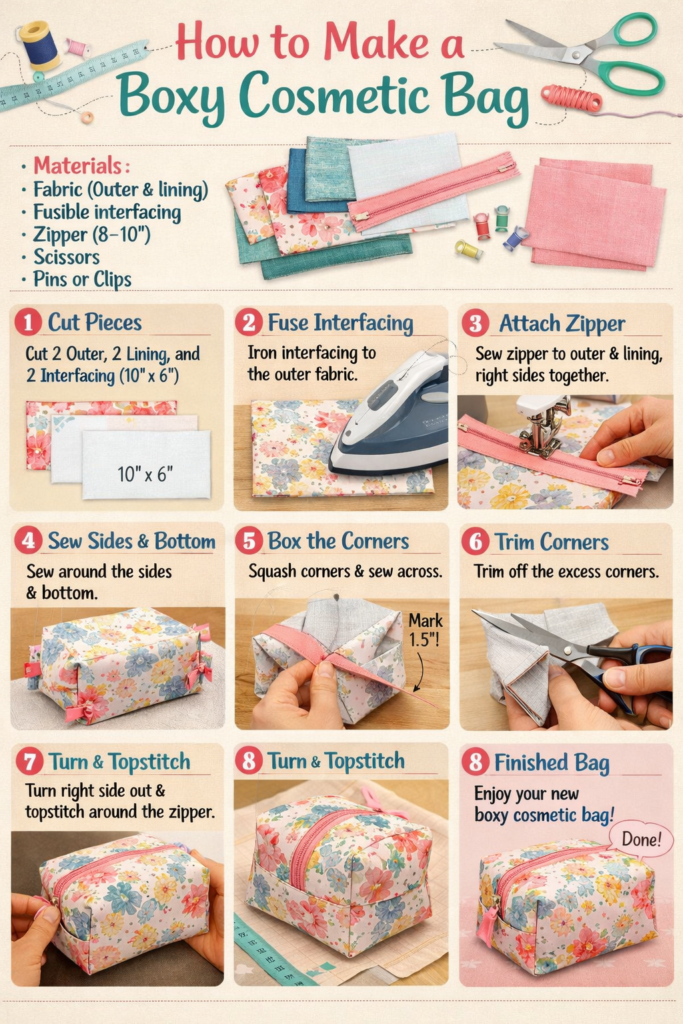
5. Step-by-Step: How to Make a Boxy Cosmetic Bag
Step 1: Install the zipper and build the top opening
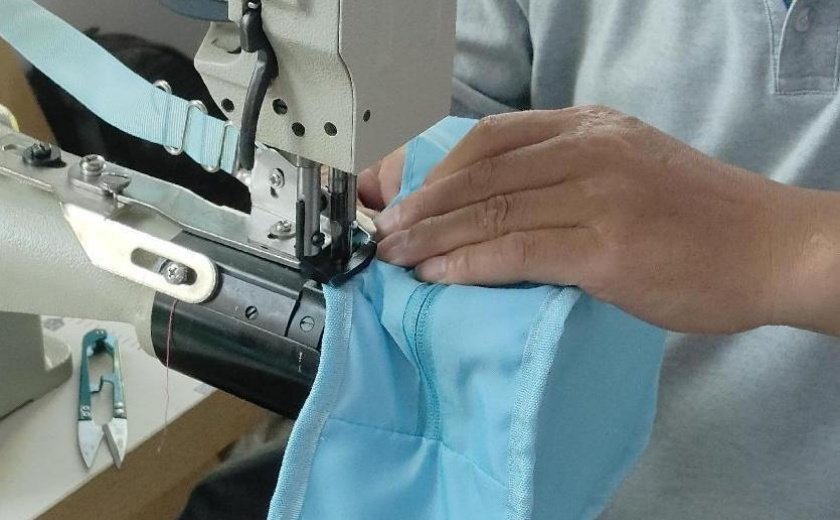
Start by attaching the zipper to the top edges of the outer and lining pieces, using the sandwich method if your pattern is lined. This is the same principle used in flat pouches, but in a boxy bag it matters even more because the zipper defines the top line of the whole silhouette. Stitch slowly and press after each side is attached. Then topstitch near the zipper to keep fabric from rolling inward.
A zipper foot makes this easier because it lets you stitch close to the teeth without drifting. SINGER specifically describes the zipper foot as the key tool for stitching neatly close to zipper coils, which is exactly what creates a more professional opening on a bag like this.
Step 2: Join the front, back, and side sections
Once the top opening is built, begin assembling the body. If you are using separate panels, pin or clip the side panels to the front and back, matching notches or corners. If you are using a single wraparound main piece, attach the end panels carefully. At this stage, easing is normal, but distortion is not. If the pieces do not align, stop and check the measurements rather than forcing the seam.
Step 3: Sew the bottom to form the boxy outline
The bottom is what makes the bag stand. Sew carefully around the lower corners, pivoting with the needle down for clean turns. If your bag is based on boxed corners rather than a separate base, this is the stage where you pinch the corner into a triangle and stitch across it to create depth. Either way, accuracy here determines whether the pouch sits flat or wobbles.
Step 4: Turn, shape, and square the bag
Before turning, trim bulk where needed and clip corners carefully. Turn the bag through the lining opening. Then push out the corners gently with a blunt point turner. Press the bag into shape and close the lining opening. Finally, shape the bag by hand so the side walls sit upright and the zipper line remains centered.
| Step | Main Goal | What to Watch |
|---|---|---|
| Zipper installation | Create a straight, balanced top opening | Do not stretch the fabric |
| Side assembly | Keep panels aligned and symmetrical | Match seam intersections carefully |
| Base formation | Build a stable footprint | Corner accuracy is critical |
| Turning and pressing | Refine the final box shape | Trim bulk before turning |
Construction Insight: Many popular box-pouch tutorials use “no raw edges” construction because it gives the inside a cleaner result and makes the bag feel more premium. That is one reason the format is so attractive for gifts, shop stock, and early product samples.
Suggested image alt: “Step-by-step assembly of a lined boxy cosmetic bag with zipper side panels and bottom structure”
6. How to Make the Bag Look More Structured
How do you avoid a collapsed shape?
If the bag caves in when empty, the issue is usually not the pattern. It is usually the relationship between fabric weight, interfacing choice, and seam handling. A light fabric with no support will not magically become crisp just because the pattern is boxy. Likewise, an over-soft lining can pull the whole form inward.
To prevent collapse, use one layer for surface appearance and one layer for support. Press thoroughly. Topstitch when the design allows it. Keep seam allowance trimmed so the corners can fold sharply instead of bunching.
Which stabilizers create the best firm effect?
For a softly structured bag, woven fusible interfacing or fusible fleece is often enough. For a more defined, retail-style silhouette, a firmer bag interfacing on the lining side can work better. BERNINA’s example of Decovil I Light for a cube-style bag and Pellon’s description of fusible fleece as adding body and stability illustrate the same principle: different stabilizers create different levels of architecture.
How do you make corners and top edges look sharper?
Sharp corners come from preparation. Trim and grade seam allowances. Avoid stacking too many heavy layers in one point. Use clips instead of forcing pins through bulky sections. Press with shape in mind. On the zipper end, flatten layers before stitching the side seam. On the base, make sure both bottom edges are truly even before sewing. Small corrections here create a bag that looks intentional instead of improvised.
Pros & Cons of a Highly Structured Boxy Cosmetic Bag
Pros
- Looks more premium on shelf and in photos
- Stands upright more reliably
- Protects contents better
- Feels closer to retail quality
Cons
- Harder to turn through the lining gap
- Bulky corners are more likely
- Cheap zippers show flaws more quickly
- Requires more careful pressing and trimming
Suggested image alt: “Structured boxy cosmetic bag with crisp corners firm base and smooth zipper line”
7. Beginner Problems When Making a Boxy Bag
What if the two sides do not match?
This is one of the most common beginner frustrations. Usually, the root cause is inaccurate cutting or seam allowance drift. Because a boxy cosmetic bag has more three-dimensional seams than a flat pouch, small errors accumulate quickly. Re-check the original pieces, then compare the stitched dimensions. If one side is off, correcting it early is better than hoping the shape will fix itself after turning.
How do you fix a bulky zipper tail?
The zipper end often becomes the thickest part of the bag. Reduce bulk by trimming layers, folding the zipper tail neatly, and avoiding too much seam allowance buildup. If the zipper end bulges after turning, it often means the layers were not flattened enough before side assembly. In some patterns, zipper tabs help distribute that thickness and create a cleaner finish.
Why is the bag bottom uneven or unstable?
An unstable bottom usually comes from one of three causes: the corners were not boxed equally, the base seam is uneven, or the interfacing support is not balanced. Sometimes the lining is also pulling against the outer shell. Pressing the base seam open before shaping the bag can help. So can measuring boxed corners carefully rather than eyeballing them.
| Problem | Likely Cause | Best Fix |
|---|---|---|
| Sides do not align | Inconsistent cutting or seam allowance | Re-measure pattern pieces and sew with a seam guide |
| Zipper end puffs up | Too much bulk at the tail | Trim layers and flatten before closing the side seam |
| Bottom will not stand flat | Unequal boxed corners or distorted base | Re-mark corners and check symmetry carefully |
| Bag looks soft and tired | Insufficient support materials | Upgrade interfacing or fleece support |
Expert Advice: When learning how to make a boxy cosmetic bag, do not jump between five different tutorials after one bad attempt. Repeat the same pattern once or twice. Consistency teaches shape faster than constant variation.
That advice also reflects the broader appeal of DIY and making culture. Grand View Research estimates the global handicrafts market at roughly $740 billion in 2024, projected to grow further by 2030, while secondary reporting on Statista’s consumer survey has noted that more than a quarter of U.S. respondents identify arts and crafts as a hobby or interest. Projects like this remain popular because they combine practical function with visible skill-building.
Suggested image alt: “Common boxy bag sewing mistakes including puffy zipper ends uneven sides and unstable base”
8. You Can Also Choose QN Bags
Design support from an experienced team
If you are using a DIY boxy bag as a concept sample, there often comes a point where home sewing is no longer enough. That is where a product development partner becomes valuable. At QN Bags, design support can help refine dimensions, materials, logo placement, construction details, and how the final bag should function in real retail or promotional use.
Free sampling support
Sampling is where ideas become testable. It helps answer practical questions such as whether the base is stable enough, whether the zipper length is right, whether the lining should be wipe-clean, and how the bag feels in the hand. If your end goal is a custom cosmetic bag program, sampling is usually the smartest bridge from inspiration to production.
OEM and ODM options
Some businesses already have a tech pack or reference image. Others only know the style direction they want. That is why OEM and ODM flexibility matters. If you want to move beyond one handmade sample and develop a retail-ready boxy cosmetic bag, you can explore custom bag solutions at QN Bags and compare what makes sense for your stage.
Clear CTA: If you are learning how to make a boxy cosmetic bag for yourself, this guide should give you a strong start. If you are developing a product for your brand, use the DIY version as proof of concept and then move into professional sampling.
Visit QN Bags
Suggested image alt: “Custom boxy cosmetic bag sample development for OEM and ODM beauty bag manufacturing”
9. Conclusion: A Better Way to Make a Boxy Cosmetic Bag
A professional-looking boxy cosmetic bag is not the result of a complicated pattern. It is the result of good choices repeated consistently: balanced proportions, accurate cutting, suitable interfacing, careful zipper installation, controlled corner shaping, and proper pressing. When those parts work together, the finished bag looks cleaner, stands better, and feels more useful.
The reason this matters goes beyond sewing technique. Beauty products continue to perform well in the market, travel and mini formats remain important, and consumers still respond to practical handmade or custom-feel accessories. That means the boxy cosmetic bag is more than a craft project. It is a format with real value in daily life, gifting, and commercial development.
Start with one size. Make it again. Refine the corners, the zipper end, and the base. That is how you move from a nice homemade pouch to a boxy cosmetic bag that genuinely looks professional. And if your next step is custom production rather than home sewing, QN Bags can help turn that concept into a production-ready item.
FAQ
1. What size should a boxy cosmetic bag be?
A practical everyday size is around 8.5 x 5 x 5 inches, but the best size depends on use. Mini versions suit touch-up essentials, while larger travel versions work better for skincare, brushes, and toiletries.
2. How do you make a cosmetic bag stand upright?
You need a stable base, balanced corner construction, and the right support materials. Interfacing or fusible fleece often makes the biggest difference.
3. What fabric works best for a boxy makeup bag?
Canvas, twill, or quilted cotton with interfacing are strong choices. Nylon is good for travel. PU or faux leather works for a more polished look but is less beginner-friendly.
4. Is a boxy cosmetic bag good for travel?
Yes. Its depth and wider opening make it better than a flat pouch for carrying mixed-size beauty items, mini bottles, and accessories while keeping everything easier to find.
5. Can beginners make a boxy cosmetic bag?
Yes, especially if they already understand straight seams and basic zipper installation. A simple box pouch is one of the best next-step projects after a flat zip pouch.
6. What interfacing is best for a more professional shape?
Light woven fusible interfacing works for stable cottons, fusible fleece adds body and softness, and firmer bag interfacings help create a crisper premium silhouette.
7. Why does my boxy bag look rounded instead of square?
This usually happens when the fabric is too soft, the corners are not boxed evenly, or the seam bulk was not trimmed enough before turning and pressing.
Suggested external source placements for your CMS:
- Introduction or trends section: Grand View Research — handicrafts market and cosmetic packaging market
- Popularity section: Circana — U.S. beauty industry growth in the first half of 2025
- Technique section: SINGER — zipper foot guidance
- Structure section: BERNINA DIY cube tutorial and Pellon 987F fusible fleece
- Craft hobby context: Statista survey references via h+h americas or Liberty London report
- Tutorial case study: Melanie Ham zippered box pouch tutorial
Tip: Keep external links in author notes, “sources,” or contextual mentions rather than crowding the main tutorial flow.
Aries Gu is the founder of Q&N. With over 17 years of experience in cosmetic bag OEM/ODM source factory. He focuses on quality control, efficient communication, and on-time delivery for global cosmetic bag projects.